Variables
What is a Variable?
In computer programming, a variable is a name the programmer gives to a value. For example, if we look at the mathematical expression 5 + 6, we know the value of that expression is 11. If we wrote an equation instead, such as x = 5 + 6, we would say that x has the value of 5 + 6, which is the same as having the value 11!
So we have given the name x to the value 11, making x a variable!
In Makecode, we can name variables nearly anything we'd like. Instead of saying x = 5 + 6, we could say fred = 5 + 6. Now, the variable fred has the value 11!
Let's look at an example in Makecode! Head to makecode.microbit.org/v4 and create a new project called "variables".
To create a variable we go to the Variables tab, click the Make a Variable button, and give it a name!
Now, we have a variable named fred, but it doesn't have a value! We can use the set fred to 0 block to give fred a value. Let's drag that block into the on start block!
Any time we want to give a variable a new value, we use the set variable to 0 block. We can change the variable we are setting by using the dropdown next to the variable name, and change the value we are setting it to by replacing the 0 with a different value. Let's try that now!
Let's set fred to a few different values, and then display fred's new value on the virtual Micro:bit. In order to show fred's value on the Micro:bit's LED's, we need to drag a show number 0 block, from the Basic tab, to the editor and place it below our set variable block! Then, click on the green play button below the virtual Micro:bit on the left to display the value 0!
Instead of showing the number 0, we actually want to show what fred's value is, so let's replace the 0 with fred's value. We can do that by opening the Variables tab and dragging the oval shaped block that says "fred" over the 0 in our show number block.
Now, our show number block will show fred's value! Experiment with changing fred's value by replacing the 0 in our set variable block with other numbers, and watch the displayed number on the virtual Micro:bit change with it!
Mini Activity: Collecting Pollen
In this activity we will take on the roll of a bumblebee and use a Micro:bit to count our collected pollen! Pretend you're the bumblebee - you'll use A+B to collect pollen, and then you'll shake the pollen off by shaking the Micro:bit!
For this activity, you'll need:
- a micro:bit (make sure you use one that's not connected to the game controller for now)
- a cable
Let's get started!
Step 1 - Create a variable
Create a new project in Makecode called "Bumblebee". Let's start by creating a new variable. Click on the Variable tab and create a new variable. This variable will represent how much pollen we are carrying around, so let's name it collectedPollen.
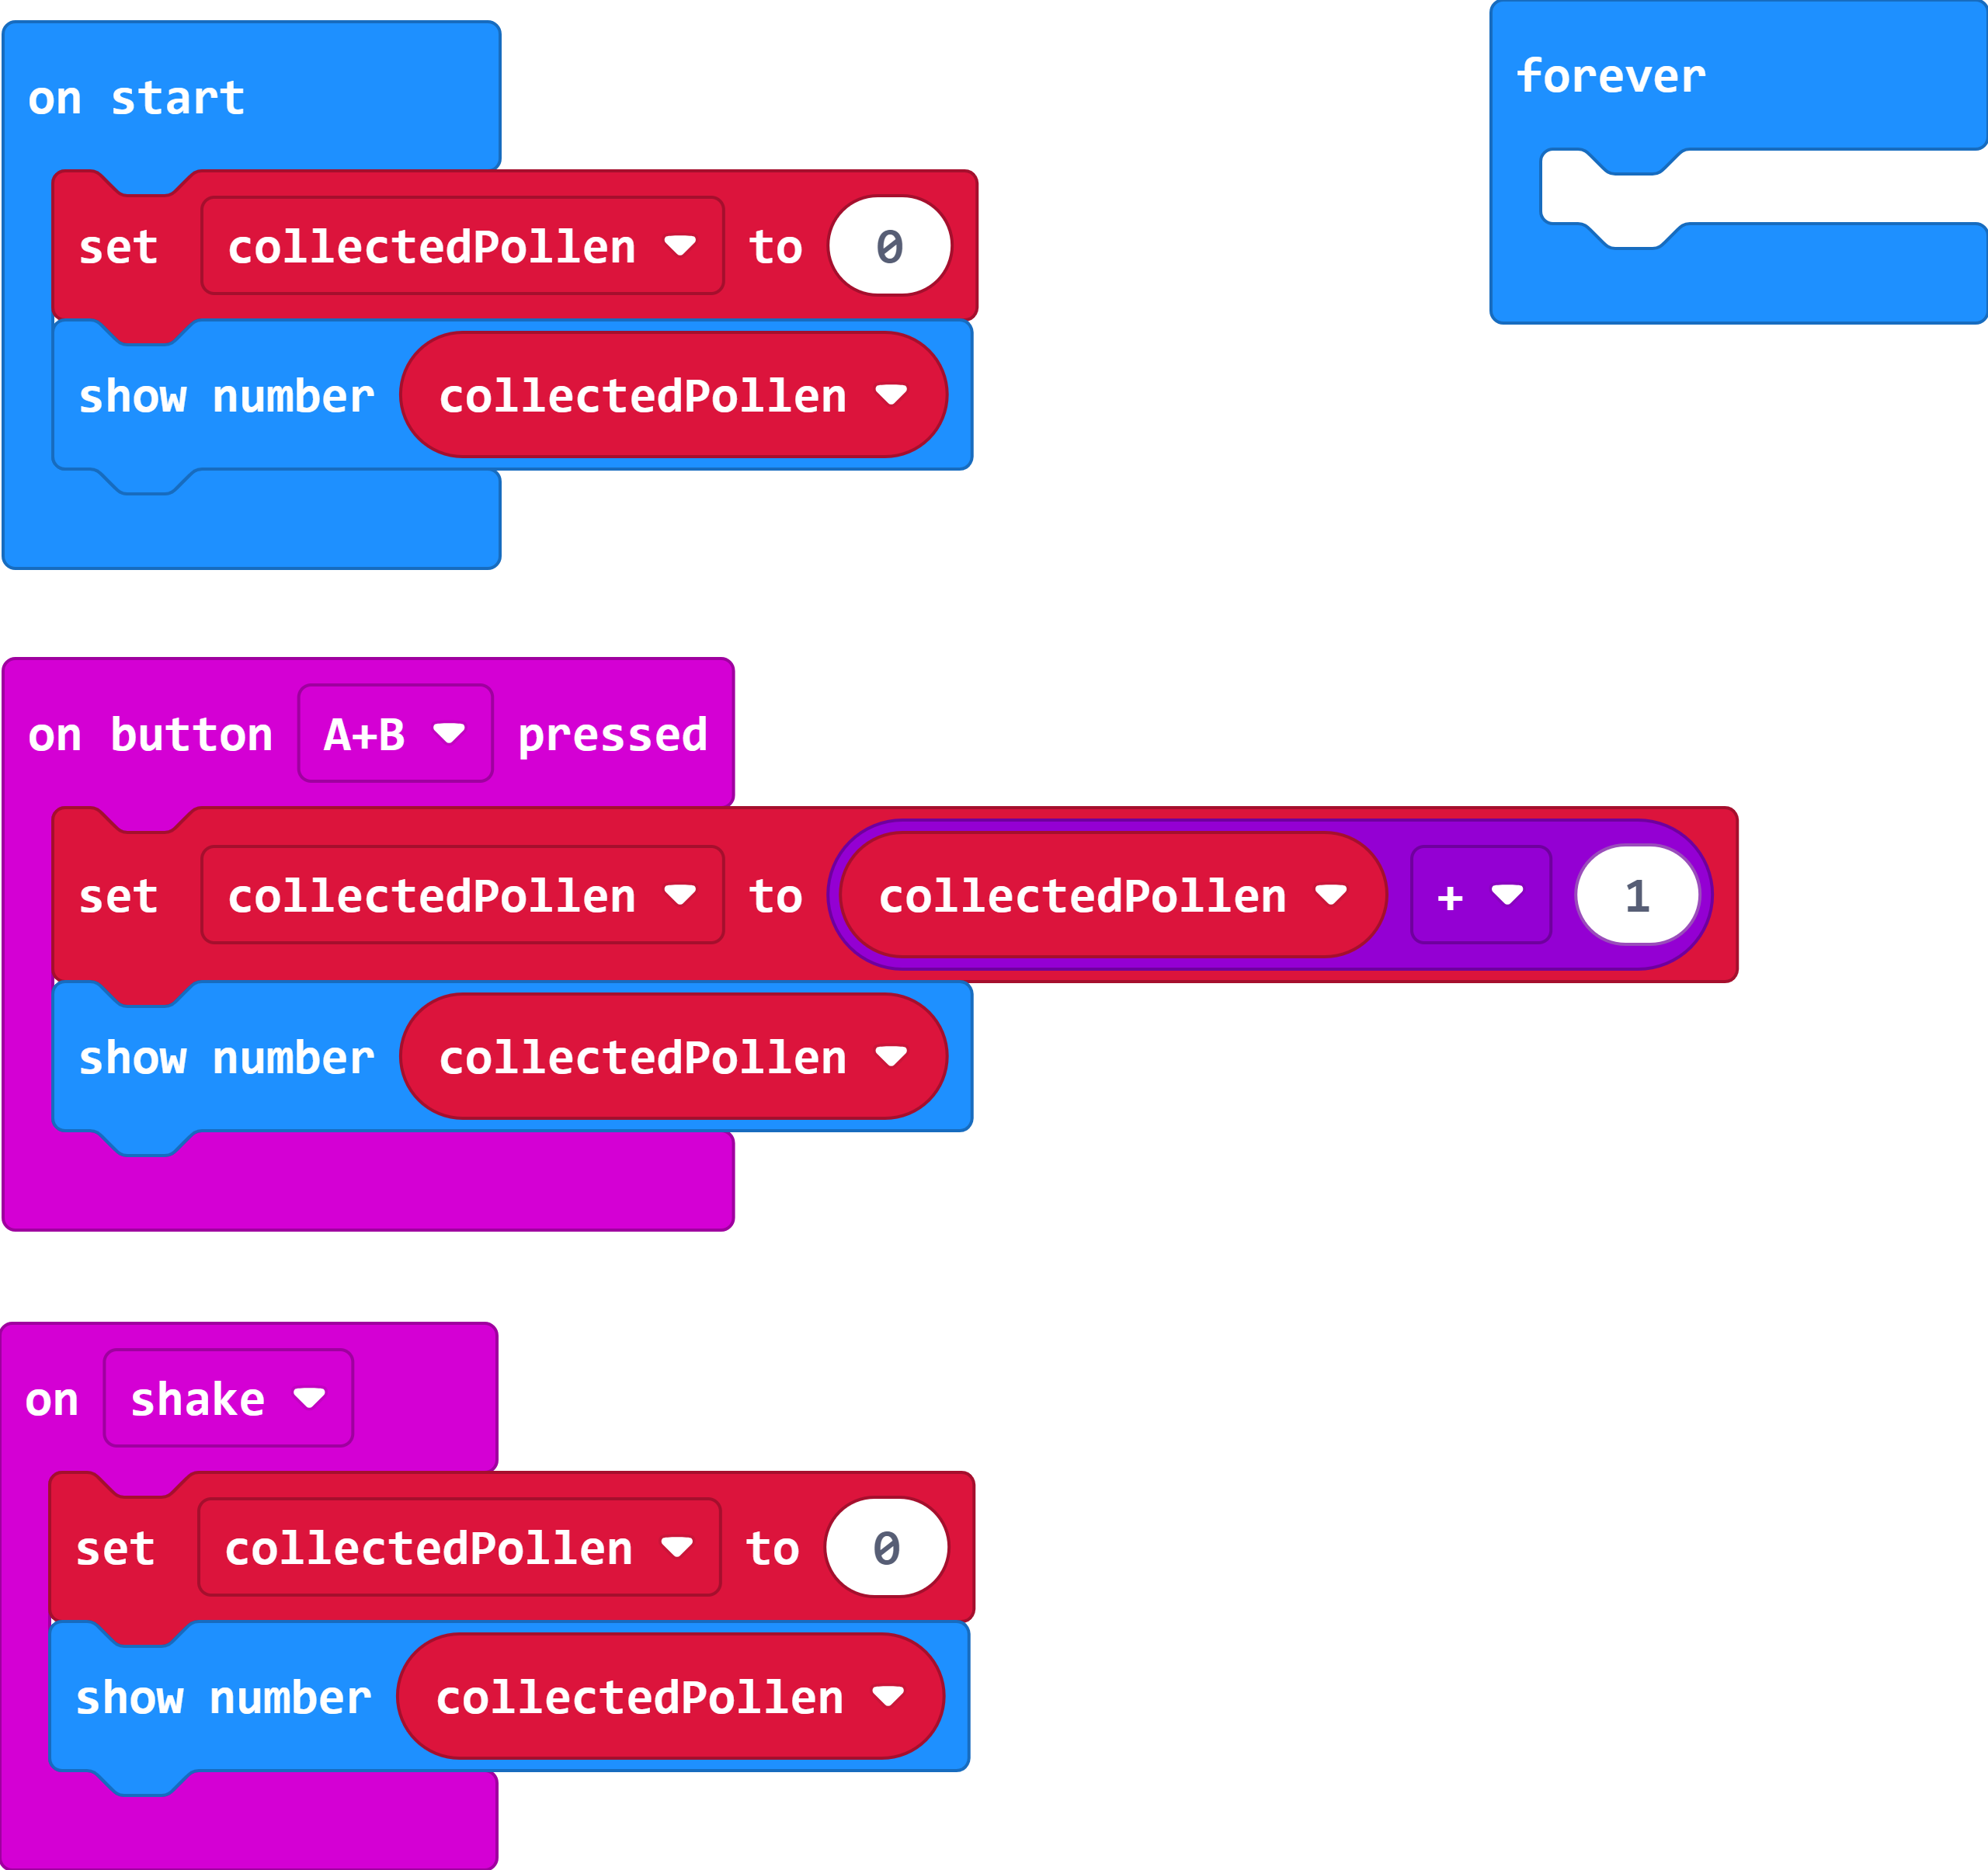
We start out with no collected pollen, so inside the on start block, let's set our collectedPollen variable to 0, and then show that variable on screen, just like we did earlier!
Step 2 - Collect pollen when we push A+B
Let's say that the way this bumblebee collects pollen is by pressing A+B on the Micro:bit, so every time we push A+B, the collectedPollen variable should increase by 1.
Go to the Input tab, and drag an on button A pressed block into the editor. Instead of A, we want to use A+B as our input, so click the dropdown in the new on button A pressed block, and change it from A to A+B. When you do this, you'll see that the virtual Micro:bit will update to include an A+B button on screen!
Now, we want the collectedPollen variable to increase by 1 every time we press A+B. In order to do this, we'll need to use some math! Start by dragging a set variable to 0 block into the editor and place it inside our on button A+B pressed block. This will set collectedPollen to 0 every time we press A+B, but we want it to increase by 1.
Head to the Math tab, select the 0+0 block, and drag it over the 0 in our set variable to 0 block!
Now, we are setting our variable to the value of a math expression! Unfortunately this one isn't very useful, because 0 + 0 will always be 0. Luckily, we can use the value of our variable in our math expression. Remember, we want to add 1 to our variable, so our math equation will look similar to this one: pollen = pollen + 1. Let's model that in our editor! Go to the Variables tab and drag your variable into one side of + sign. Replace the other 0 with a 1!
Now that we have our math working, we want to show the new value of pollen on the screen. Add a show number block under the set variable block, and set it to show pollen.
Go ahead and flash your micro:bit to test it out. When you push the A and B buttons together, the micro:bit should count up!
Step 3 - Shake off the pollen when we shake the Micro:bit
We're almost done! In our goal, we said that we wanted to be able to shake the pollen off. First, we need an on shake input block from the Input tab. Go ahead and drag an on shake block into the editor.
When we shake the microbit, we want to set pollen to 0. Do you remember where else in our program we set pollen to 0? In the on start block! We'll do the same thing here, inside the on shake block.
Solution Code

Flash it on your micro:bit and test it out! Your micro:bit should count up when you press A and B together, and it should reset to 0 when you shake the micro:bit.
Congratulations! Now that you've got a very simple pollen counter, we're going to learn some ways to make it even better! Keep this code open in a tab on your computer - we will use it again later.
How Do Micro:bits Communicate?
Micro:bits communicate with each other with radio waves. Radio waves allow us to wirelessly connect all sorts of devices, like cell phones, FM and AM radios, and GPS systems! You can use a radio to send and receive messages between micro:bits, like very simple cell phones. If you have a bunch of micro:bits, you can program them to communicate on different radio groups to avoid interference, just like different radio stations broadcasting on specific signals.
Micro:bits can't communicate quite as far as these other devices, but over a short distance, they're able to communicate all sorts of information with each other!
Radio blocks in MakeCode
The radio tab is split into three categories: group, send, and receive.
Group:
There's only one very important block under "groups". The Radio set group block works like setting a channel on a walkie-talkie. Micro:bits only communicate with other micro:bits that are in the same radio group
Send/receive:
The six blocks under these two categories all work in pairs.
- The
radio send numberandon radio receivedNumberblocks let us send and receive numbers from one micro:bit to another. For example, if you wanted to measure the temperature of your refrigerator, you could program one micro:bit to collect temperature data from inside the fridge, and send that data to another micro:bit so you can see the temperature even with the fridge door closed. - The radio
send value "name" = 0andon radio received name valueblocks let us label whatever we are sending from one micro:bit, so that our other micro:bits can differentiate between incoming values. In computer science, we call this a name value pair, and it's a common way to organize data. Sending and receiving values with names keeps things organized when you want to send more than one type of value. For example, if you wanted to test the temperature and humidity of your refrigerator, you would use name value pairs so that it's clear which values are temperature and which are humidity. - The
radio send stringandon radio received stringblocks work exactly like the radio send/receive number blocks, except they send and receive strings instead of numbers.
There are other radio blocks that you can explore, but these are the ones we will use in our programs this week.
Activity: Communicating with the Hive
Let's use radio communication between micro:bits to improve our simple pollen counter! Even though our micro:bits will count as high as we want them to, in real life, bumblebees can only carry so much pollen. Let's create a hive where we can store the pollen that we're collecting!
Setup
Make sure your bumblebee code from the Collecting Pollen mini activity is open and that it is correct - we'll be using that in this activity. In case you need it, here's a completed version of the "Collecting Pollen" mini activity. You'll also need:
- two micro:bits (neither one should be attached to the game controller)
- one micro:bit cable
- two micro:bit battery packs
Step 1 - Set bumblebee radiogroup
Let's start by adding some things to the bumblebee code that we just wrote. Remember that in order for the micro:bits to communicate with each other, we have to tell them to look for the appropriate signal.
- Open the
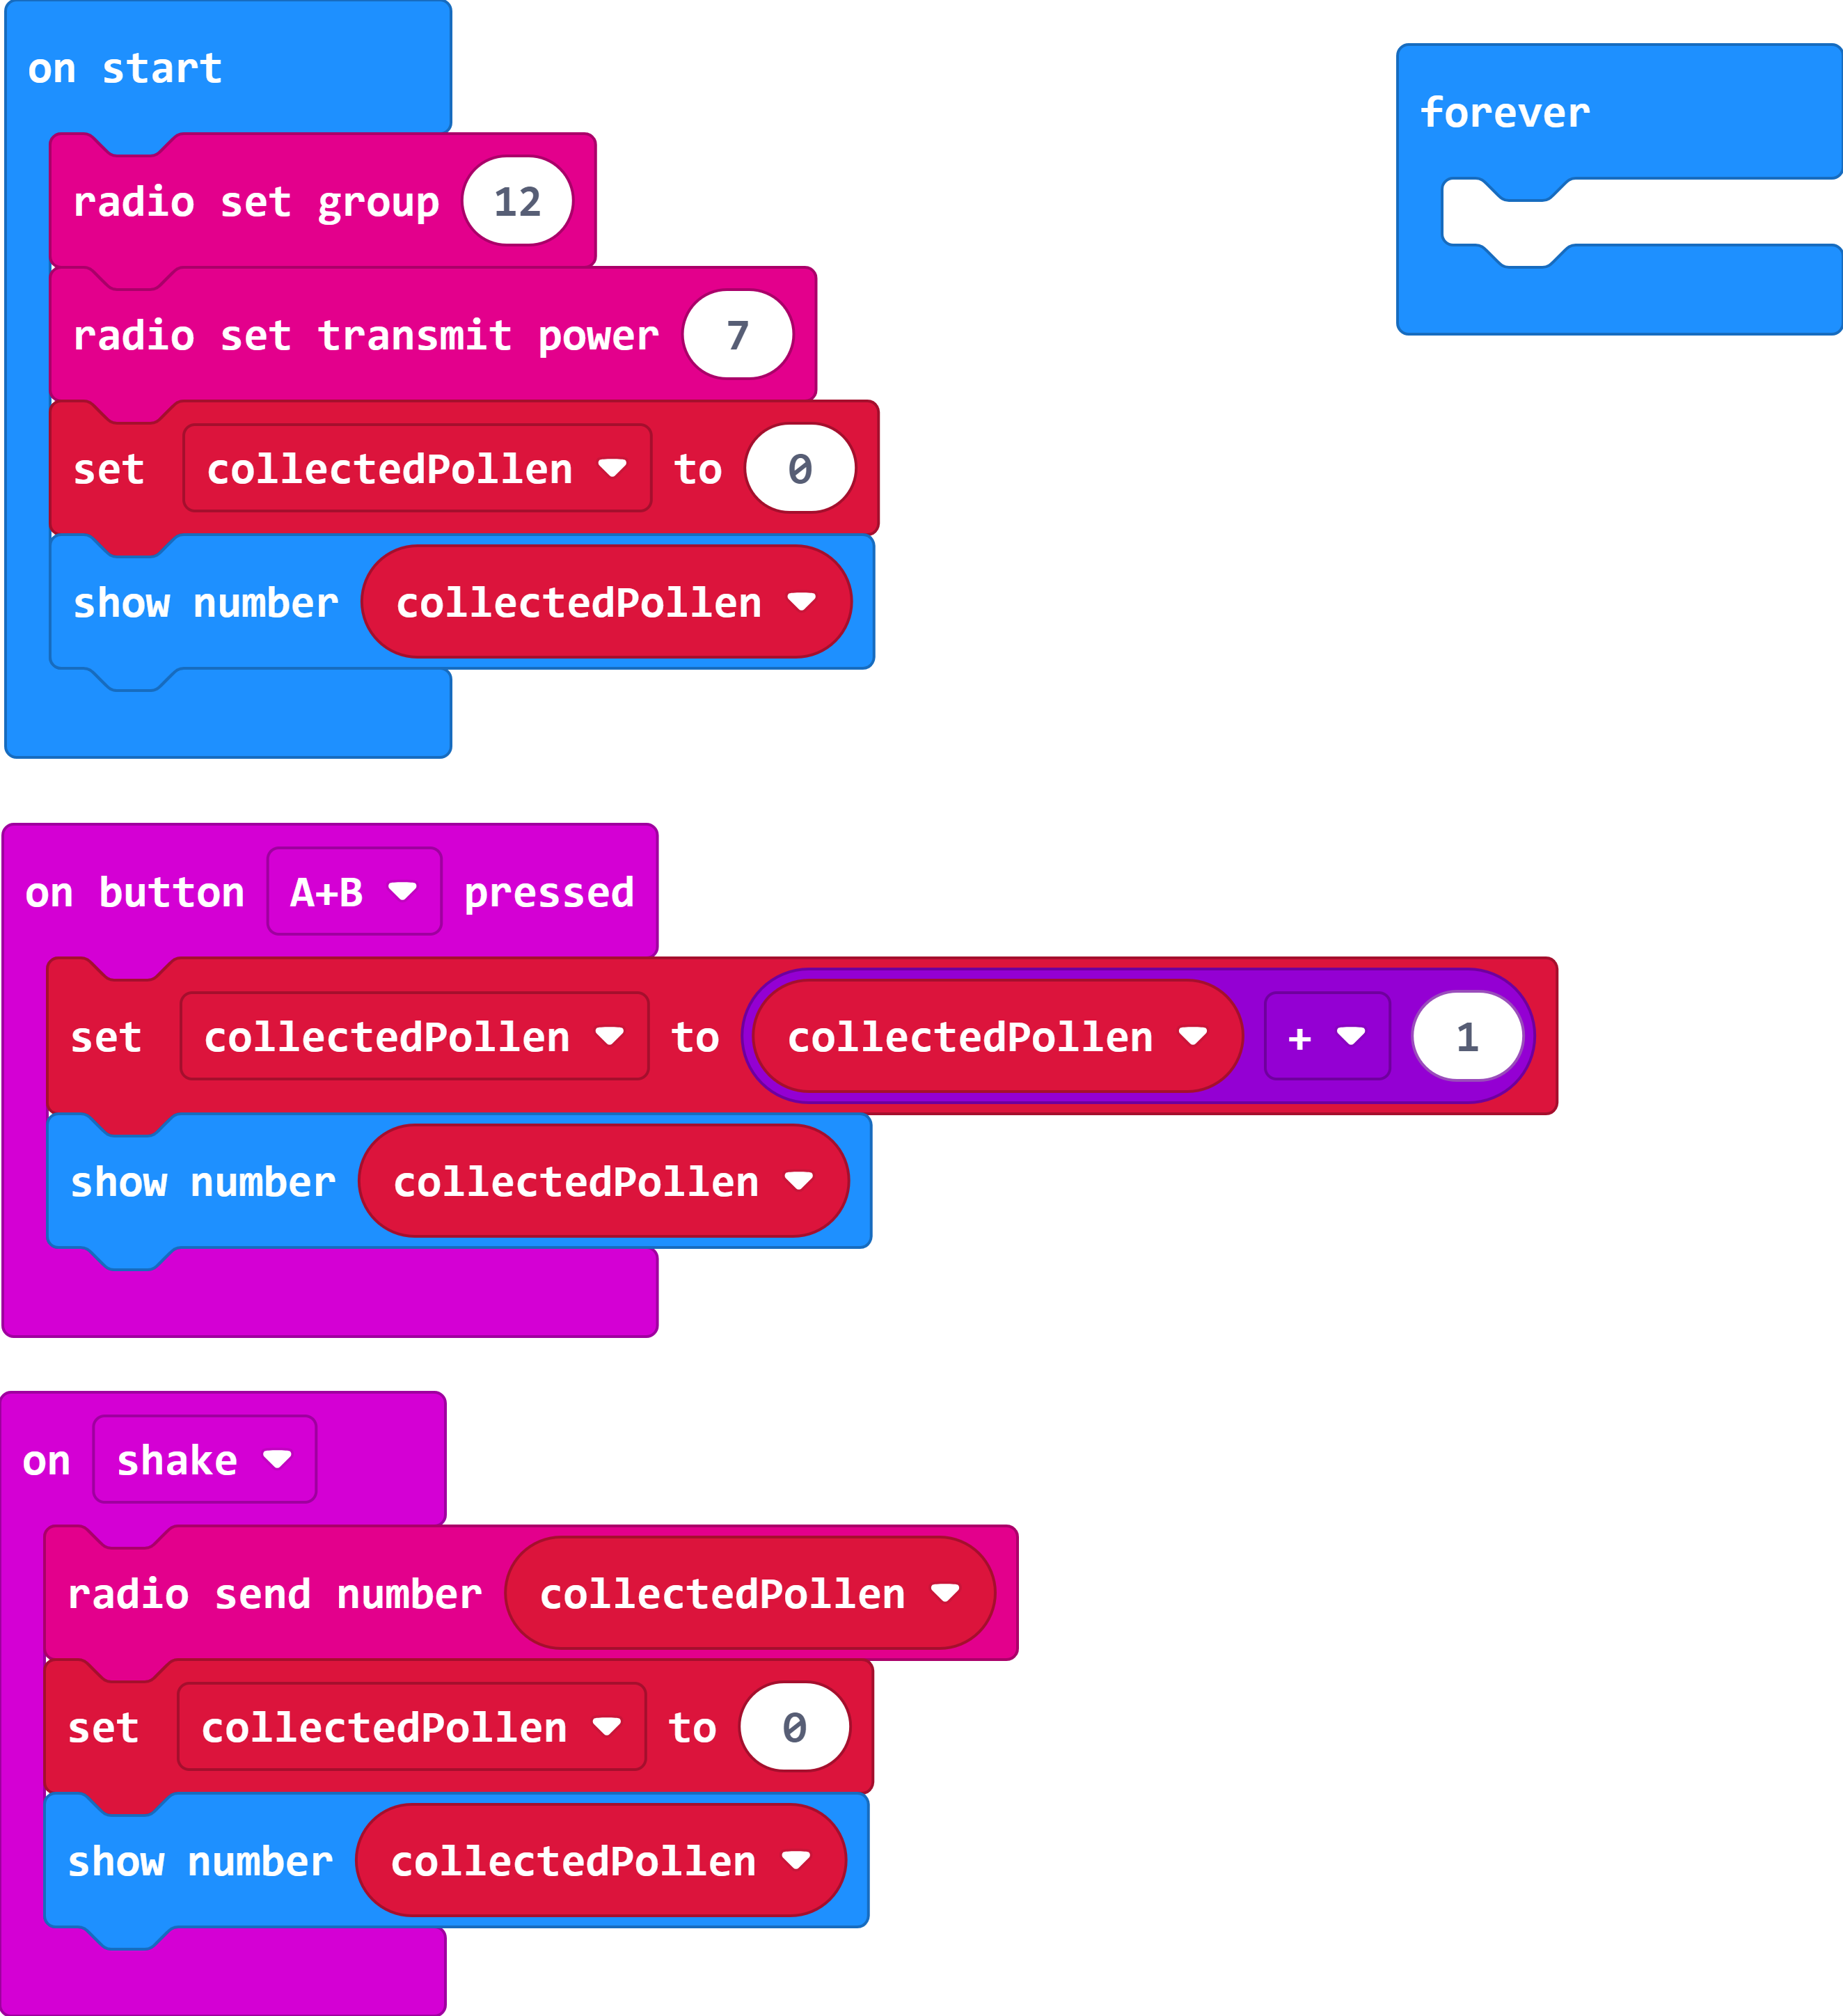
Radiotab and look for theradio set group 1block. Drag aradio set group 1block into the top of theon startblock, and set the radio group to12 - Then, from the
moremenu within theRadiotab, drag aradio set transmit powerblock into the editor - Place the
radio set transmit powerblock in theon startblock, below theradio set groupblock. We'll leave theradio set transmit powerset to7.
Step 2 - Send pollen to the hive
Right now, our program resets the pollen count to 0 when we shake the micro:bit, but that pollen isn't going anywhere. We want this pollen to go to the hive! We'll do this with the micro:bit's radio transmission.
- From the
Radiotab, grab aradio send number 0block. - We want the pollen to go into the hive when we shake the micro:bit, so let's add the
radio send number 0block to the top of ouron shakeblock. - We don't want to send
0, though. Instead, we want to send our collected pollen. We can do that with ourcollectedPollenvariable! Replace the0in thesend number 0block with thecollectedPollenvariable. This will send a radio message containing the value of thecollectedPollenvariable! Since we're using this variable, it's important that thesend number collectedPollenblock is at the top of theon shakeblock. Otherwise, we'll be trying to send the variable after we reset it to 0 every time!
Go ahead and flash this to one of your micro:bits and test it out. Check that the micro:bit counts up when you press A+B, and make sure it resets when you shake the micro:bit. Once everything seems to be working, unplug that micro:bit, carefully connect it to a battery pack, and set it to the side so that we can work on the hive!
Step 3 - Set up the hive to receive messages from the bumblebee
Next, we'll need to set up the hive to collect our pollen! Remember that in the bumblebee code, we used a radio send number block to send the value of our collectedPollen variable out.
Start by making a new project named "hive". In order for the hive to receive this message, the first thing we'll need to do is make sure that the hive is set to the same radiogroup that as the bumblebee, so that the micro:bits can communicate. We'll need to set up the same
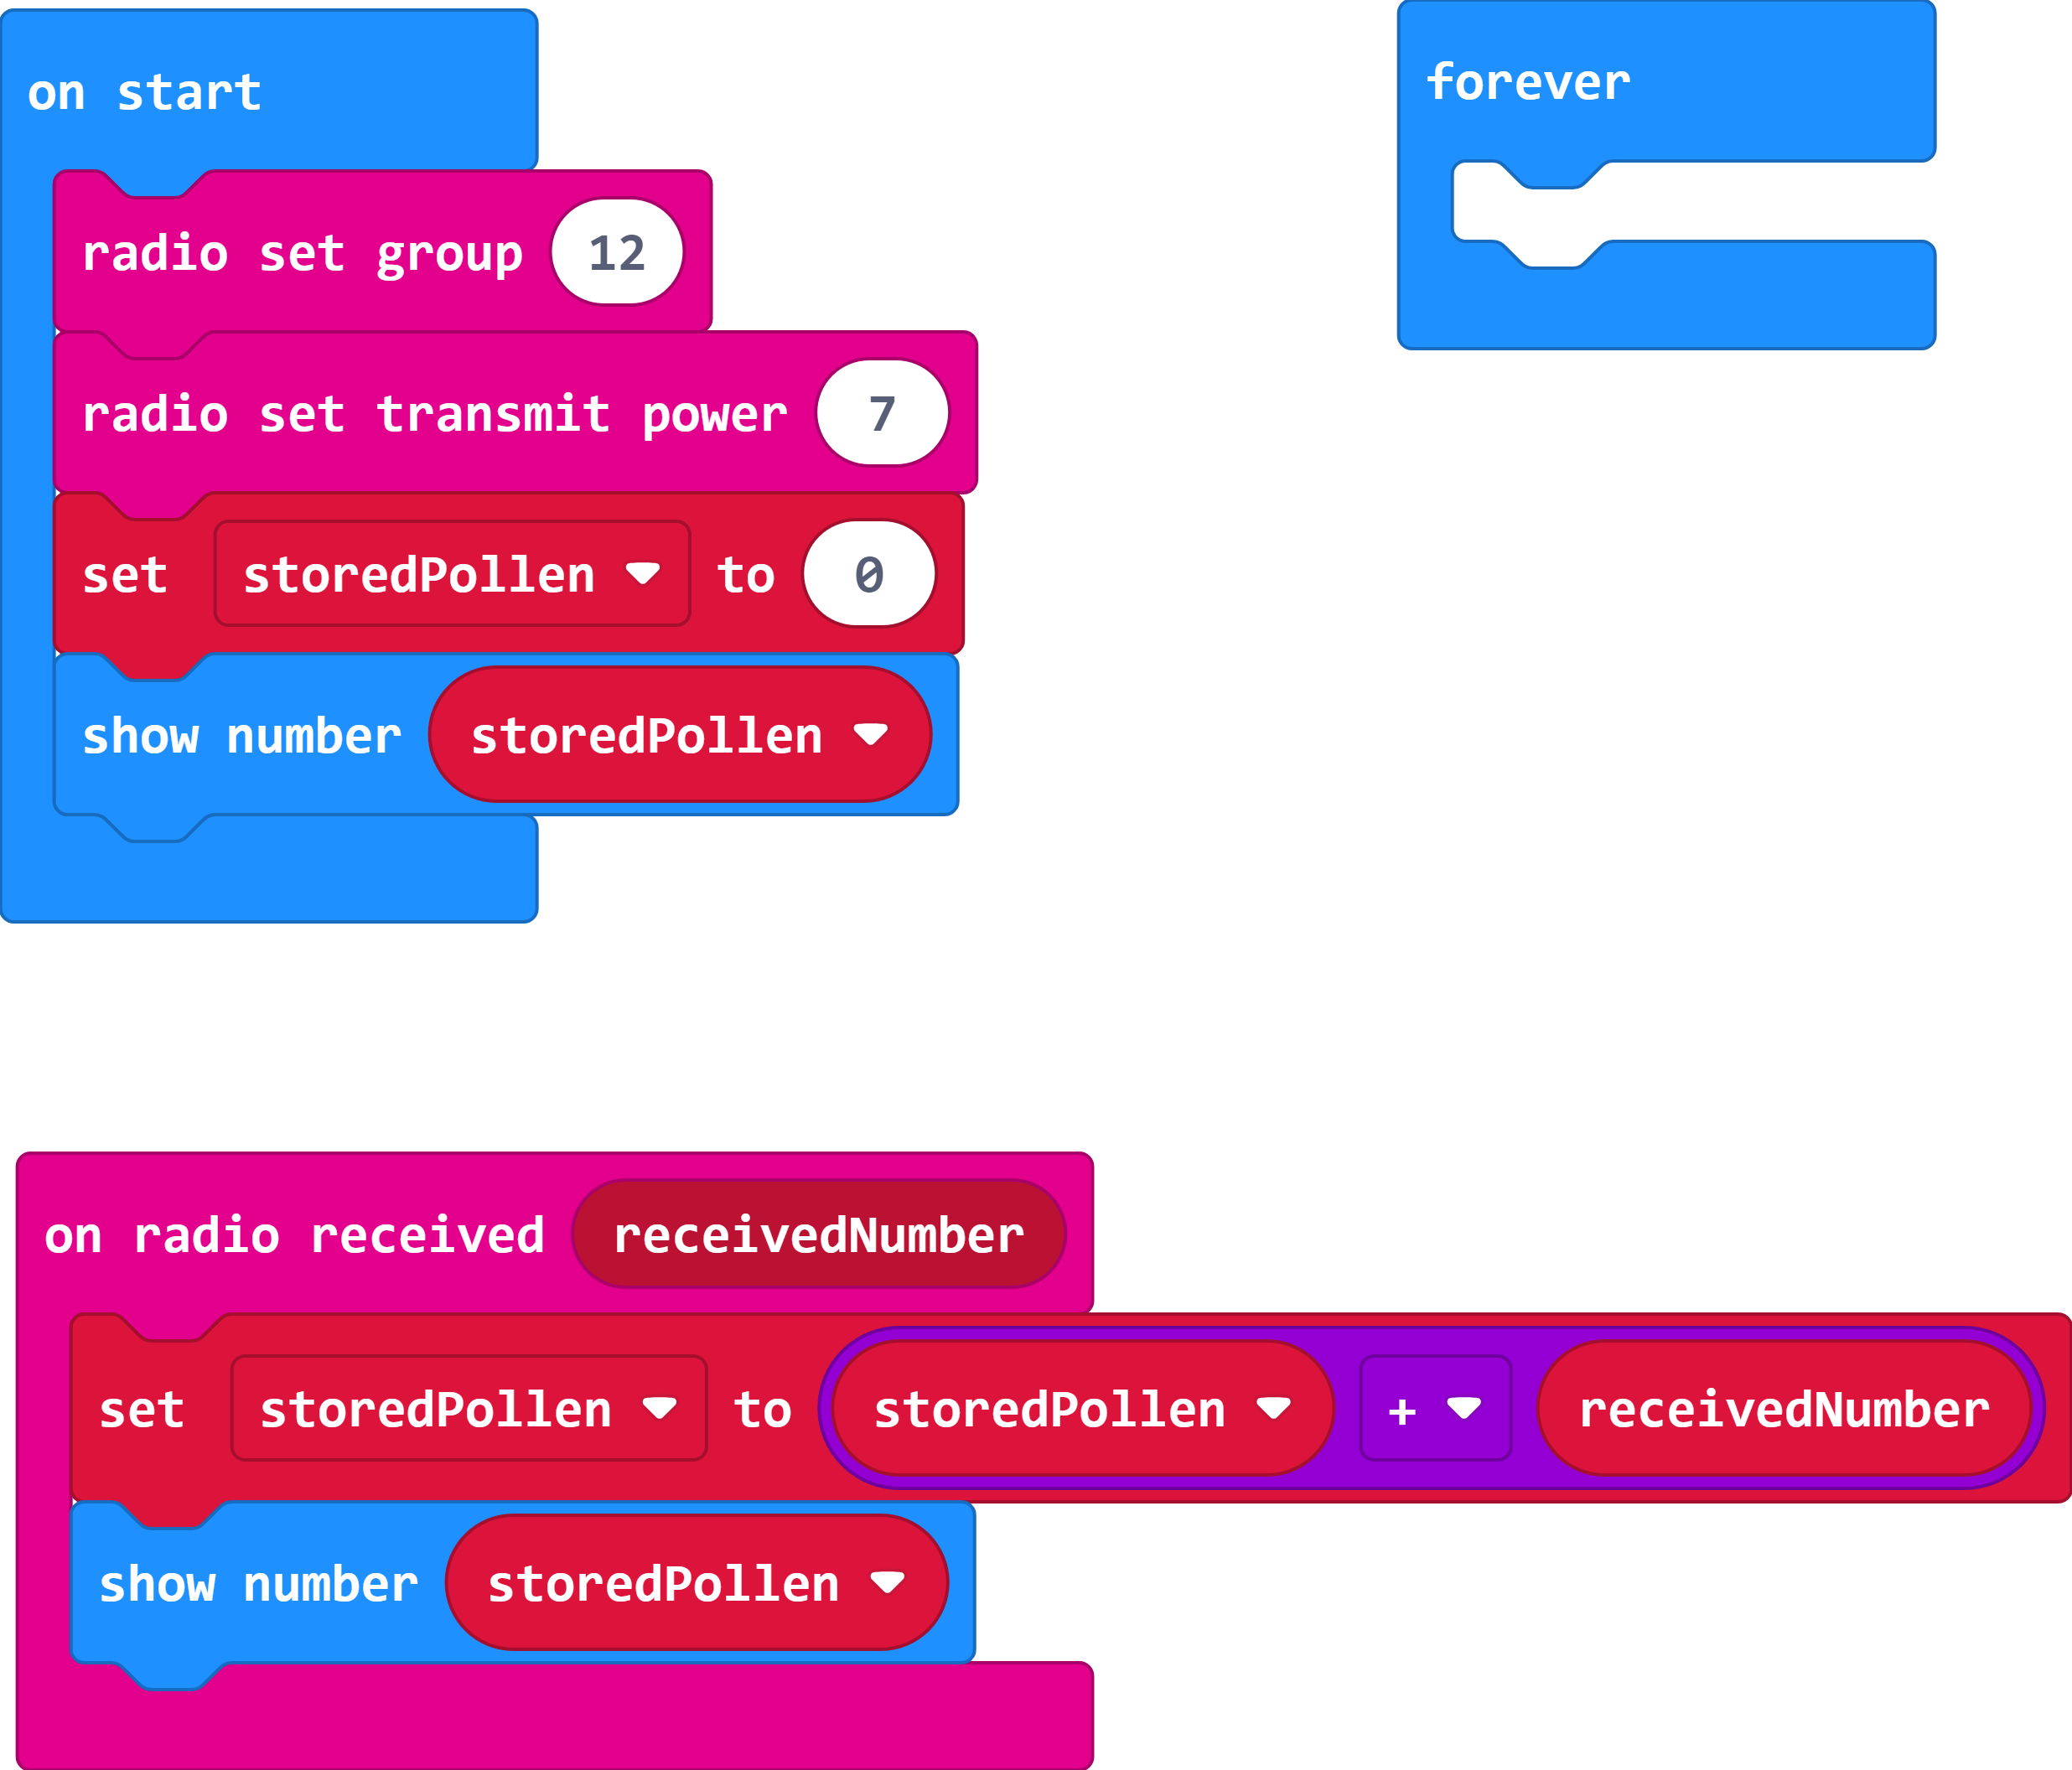
radio set groupblock that we used in the bumblebee code. Add aradio set groupblock set to12and aradio set transmit powerset to7in theon startblock.We sent the value of
collectedPollento the hive with aradio send numberblock, so we can use anon radio received receivedNumberblock to tell our micro:bit what to do when it gets that message. Go into theRadiotab, and drag anon radio received receivedNumberblock into the editor.Now, the value of
collectedPollenis represented in our hive by thereceivedNumberpart of theon radio received receivedNumberblock, and we can tell the hive what to do when it receives that value! Let's make sure that the hive is receiving this message as expected. To do this, we'll put ashow number 0block into ouron radio received receivedNumberblock. Your code should look like this:Instead of
0, we want to show the amount of pollen the bumblebee has sent the hive. To do this, we'll dragreceivedNumberfrom theon radio received receivedNumberto replace the0in theshow number 0 block.
Go ahead and flash your code now to check. Make sure you flash your hive code to a different miro:bit than your bumblebee code, and that you've got your bumblebee micro:bit connected (carefully!) to a battery pack. Now, when you collect pollen with the bumblebee micro:bit and shake it off, the amount of pollen that you've shaken off should appear on the hive micro:bit!
Step 4 - Turn collected pollen into stored pollen
Now our hive will receive a message containing the value of collectedPollen from the bumblebee, but we need to tell it what to do with that message!
We know that we want our hive to store all of the collected pollen that it gets from the bumblebee. We can do that with a variable! In the hive program, let's create a new variable called
storedPollen.We want
storedPollento start at 0, so let's add aset storedPollen to 0to the bottom of ouron startblock. Let's also add ashow number storedPollenblock to the bottom of ouron startblock, so that we can see how much pollen we've stored in our hive.Now, when the hive gets collected pollen from the bumblebee, we want it to add that to our stored pollen. Let's put a
set storedPollen to 0block into ouron radio received receivedNumberblock.We don't actually want to set
storedPollento0when we getcollectedPollenfrom the bumblebee. Instead, we want to add the value ofcollectedPollenfrom the bumblebee to the value of our newstoredPollenvariable in the hive. To do this, we'll need to use some math! In theset storedPollen to 0block, replace the0with a0+0block from theMathtab.Since we're adding to the value of our
storedPollen, we know that we need to replace a0in the0+0block with ourstoredPollenvariable. Go ahead and drag astoredPollenblock into one side of our math equation.We've got one half of our equation, but what do we put on the other side? We want to add
collectedPollento ourstoredPollen, but thecollectedPollenvariable is in our other program! Remember that the value ofcollectedPollenis represented in our hive by thereceivedNumberpart of theon radio received receivedNumberblock. All we need to do is drag thereceivedNumberinto the other side of our equation.Now, our
storedPollenvariable will equal the amount of stored pollen we have plus any more collected pollen the bumblebee brings, and we only have one more thing to do! If we flashed our micro:bit right now, it would still just show us how muchcollectedPollenthe bumblebee is sending over. Instead, we want the micro:bit to show us the updated value of ourstoredPollenvariable so we know the total amount of pollen we have collected! In theshow number receivedNumberblock in ouron radio receivedblock we need to replacereceivedNumberwith ourstoredPollenvariable.
Step 5 - Flash code
We're almost done! Let's make sure everything looks right! Your final bumblebee code should look like this:
Final Bee Code

This should already be flashed to one of your micro:bits from before, but go ahead and make sure your code is right and flash it on to one of your micro:bits. Go ahead and also attach this micro:bit to a battery pack. Don't forget to be very careful when plugging the battery pack in!
Your final hive code should look like this:
Final Hive Code

Let's flash our hive code and try it out. You can leave the hive micro:bit plugged in to power it, or connect it to a battery pack if you want.
Now, lets test it out! Push A+B on the bumblebee micro:bit to collect some pollen, and then shake the bumblebee micro:bit to shake the pollen off and store it in the hive. You should see the amount of stored pollen in the hive increase by the amount of collected pollen you shake off!