Loops & Functions
Control Flow: Loops
Another method we have to control the path our program takes is by using loops! Loops allow us to run the same blocks multiple times. Loops also use conditions to determine how many times the code should run in the blocks.
There are several different types of loops available to use in the Loops tab, let's talk about a few of them:
Repeat Loop
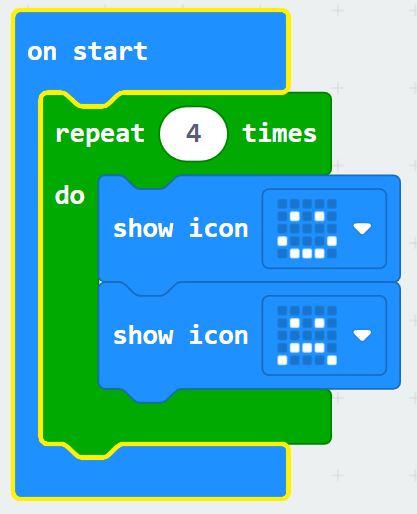
The repeat loop runs the blocks inside of it the number of times you specify (which can also be a variable). In this example, a happy face and sad face flash back and forth 4 times.
For Loop
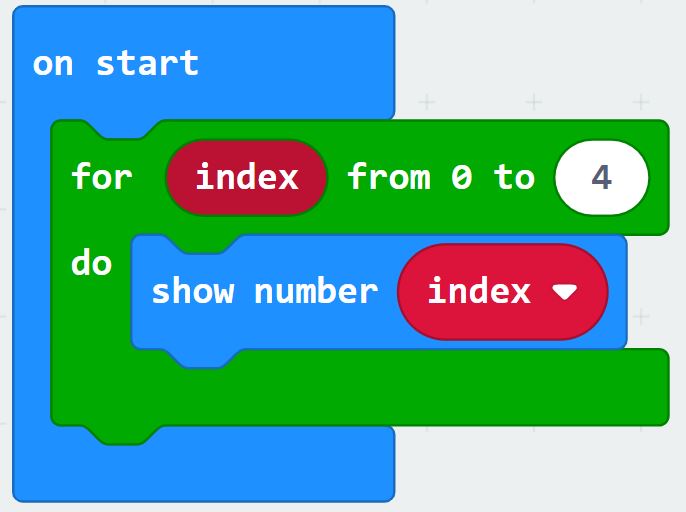
The for loop is similar to the repeat loop because it also runs the blocks inside of it the number of times you specify. However, for loops have a special variable called an index. This variable can be named "index," but it does not have to be. Sometimes programmers use "i" or "counter" instead. The index value automatically increases at the end of each loop. The loop stops once the desired value is reached. In this example, we display the index value which starts at 0 and goes up to 4.
While Loop
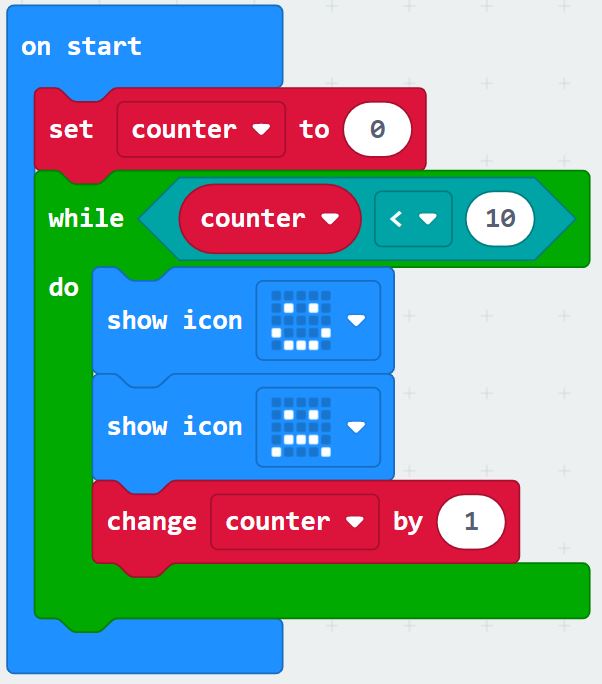
The while loop will keep repeating the blocks inside of it until its boolean expression becomes false! In the above example, a variable called counter starts at 0, and each time the loop runs its value increases by 1. Each time the loop finishes one loop of code, it checks the condition; if the condition is still true, it runs the code again. Eventually, this loop stops when counter has the value of 10. The condition counter < 10 is false, and the loop stops.
Forever Block
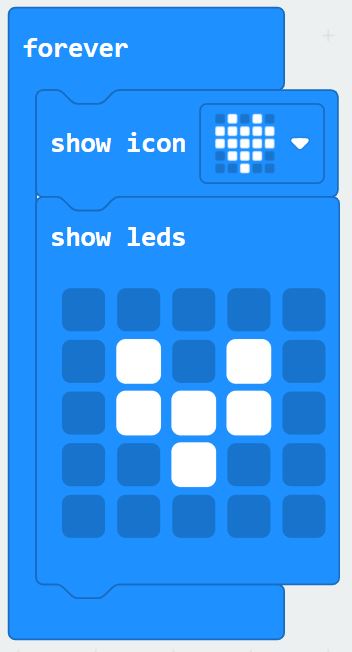
By now you have noticed that when we start a new program, a forever block is in the editor automatically. The forever block is actually just a loop that runs forever! Any blocks that are within the forever block will continue to execute as long as the micro:bit has power. The example above will show a beating heart until your micro:bit dies.
Activity: Busy Bee
In this activity, we are going to put our knowledge of loops to the test! We are going to create a simple bee sprite that buzzes around the Micro:bit in search of nectar.
Setup
You'll need these things:
- 1 micro:bit for the bee
- 1 micro:bit cable for the hive
- micro:bit cable
- Bumblebee Code
- Completed Hive
Step 1 - Create a bee sprite
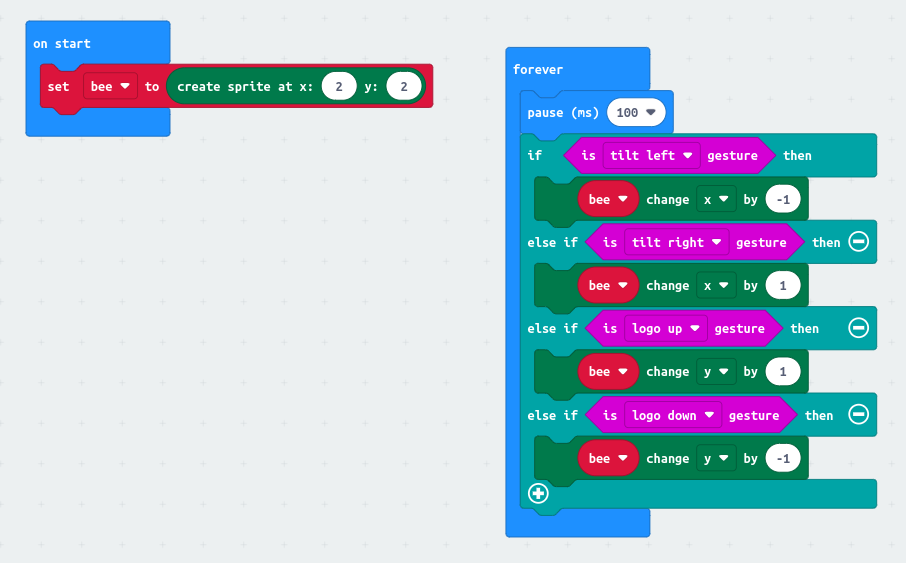
First, we will create a bee variable. Let's set that variable to create sprite at x:2 y:2. This will add an LED to the center of the micro:bit to represent the bee. Now, let's add some movement to the bee. Grab an if statement, place it in the forever block, and expand it so that their is four conditions (one if and three else ifs). We will the input is tilt left gesture, is tilt right gesture, is logo up gesture, and is logo down gesture boolean values to move the bee. In each section of the if statement, use a bee change _ by _. Experiment with what you think these values will be, then check your code below. You may find it difficult to control the bee since it moves so fast. You can fix this by adding a pause _ ms block to the end of each if statement.
Click to see code
Step 2 - Create a nectar sprite
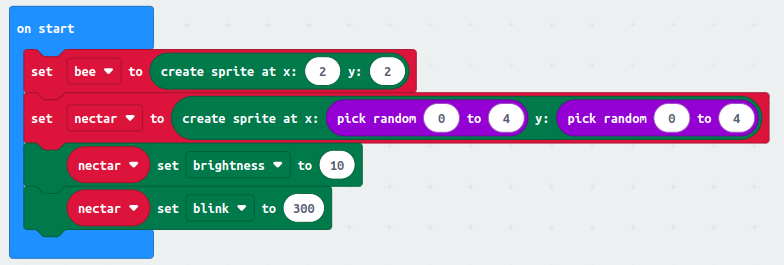
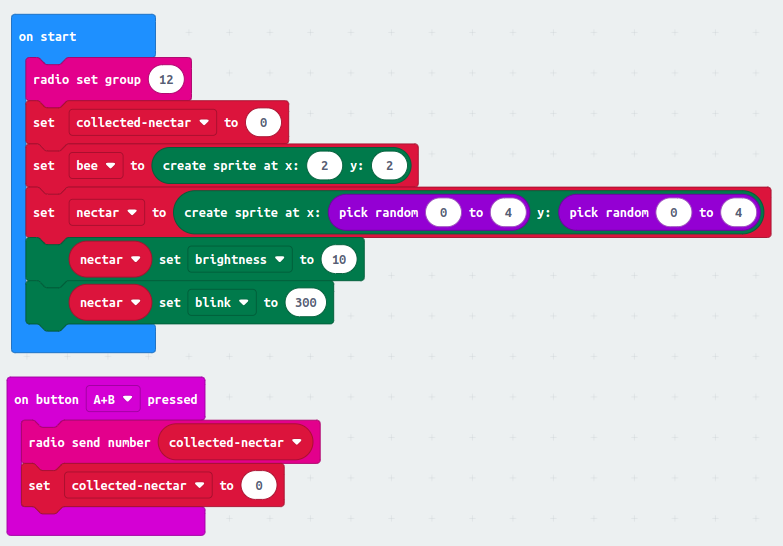
Our bee looks awesome, and it flies around the screen quickly! However, there is no nectar for the bee. Let's add that now. Create a nectar variable and set it to create sprite at x:pick random 0 to 4 y: pick random 0 to 4 so that it is in a random spot. It is hard to tell the bee and nectar apart, so let's add a nectar set brightness to 10 and a nectar set blink to 300.
Click to see code
Step 3 - Collect nectar
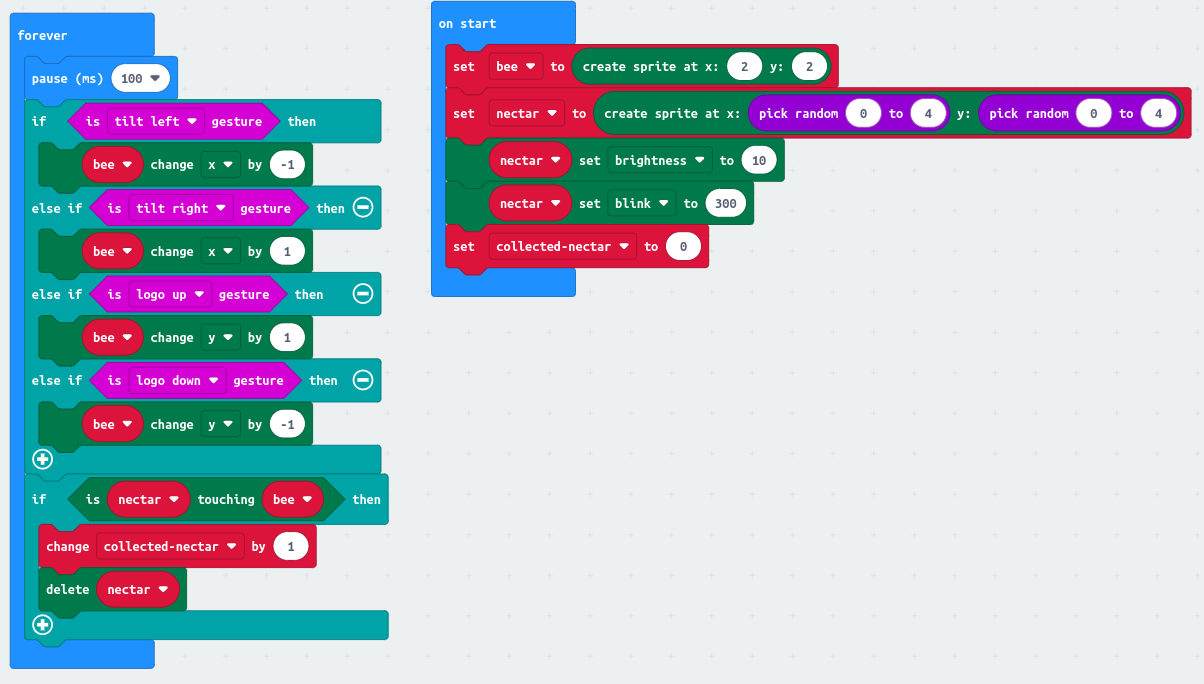
Now that we have a bee and nectar, we need to collect the nectar. Start by creating a variable named collected-nectar and set it to 0 in the on start block. Then, add another if statement to the forever block. It should say if is nectar touching bee. This block can be found in the game tab as if sprite touching _. In the if statement, add a change collected-nectar by 1 block. This will increase the value of collected-nectar by 1 each time the bee touches the nectar. Finally, add a delete nectar block to the if statement. This will remove the nectar from the screen once it is collected.
Click to see code
Step 4 - Spawn nectar
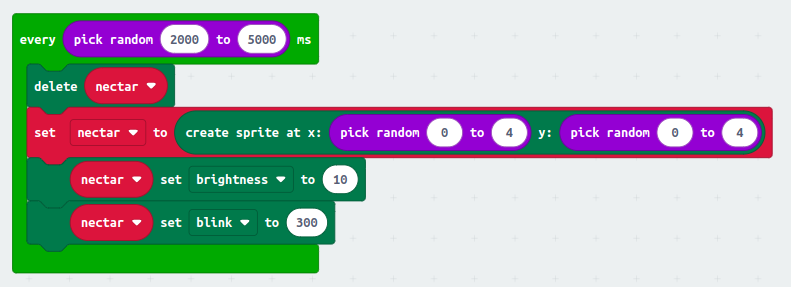
Our game is looking good, but we have not added a way to create more nectar. Let's make the new nectar appear in a random spot. Grab a every 500 ms block from the loops tab. Replace the 500 ms with pick random 0 to 10. Change the 0 and 10 to 2000 and 5000. Now, this loop will run every 2 to 5 seconds. Inside the loop, add a delete nectar block, create sprite at x:pick random 0 to 4 y: pick random 0 to 4 block, nectar set brightness to 10, and nectar set blink to 300. This will delete the old nectar, create a new nectar in a random spot, and make it blink.
Click to see code
Step 5 - Send collected nectar
Now that we have a way to collect nectar, we need to send it to the hive. Let's send nectar when we press a+b. Grab an on button a+b block from the input tab. Inside the block, add a radio send number collected-nectar block. This will send the value of collected-nectar to the hive. Make sure to set collected-nectar back to zero after you send the value. Since we are using radio communication, let's add a set radio group block to on start. Remember the group you use, otherwise the bee won't be able to talk to the hive.
Click to see code
Step 6 - Test it!
The last step of this activity is to test it! Download the code to your micro:bit and see if you can collect nectar and send it to the hive. If you are having trouble, check your code against the code below. Make sure the hive is on the same radio group as the bee.
Functions
What is a function?
In computer programming, functions provide a way to reuse code and simplify complex blocks. Simply put, they are blocks of code that are given a name. We can use this name to to call the function from anywhere in our code. Whenever we call a function, the computer will run whatever block of code is attached to the name we called.
Functions in code are just like apps in your phone, tablet, or computer. Think about some apps that you use - like the camera, the calculator, and your favorite web browser. What do all these apps have in common? They each complete a certain task - for example, your camera app is used only to take pictures and record videos, your calculator app is used to compute math problems, and your web browser can access the internet! This is exactly why we use functions in our code - it's a great way to separate different tasks that certain code blocks accomplish.
Let's look at an example in MakeCode. If we wanted our micro:bit to show a heart every time any button or pin is pressed, we would need to drag 12 blocks into the editor: 3 on button pressed blocks, 3 on pin pressed blocks, and 6 show heart blocks.
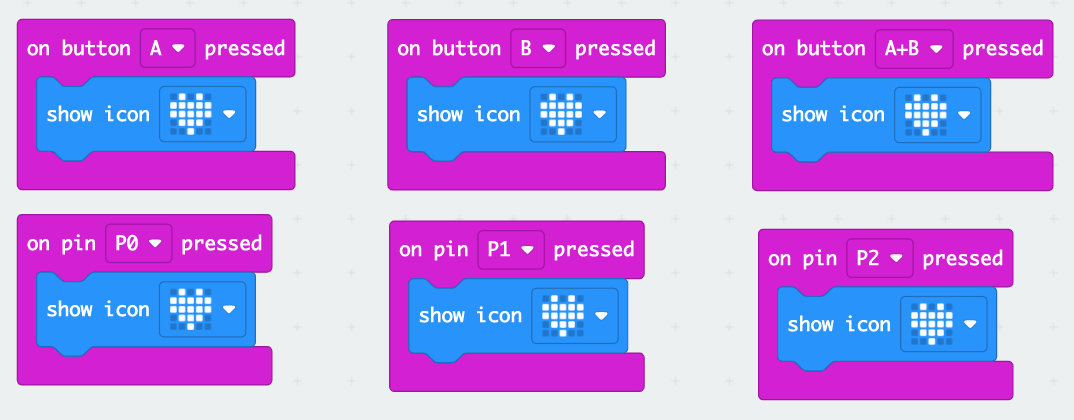
After testing our program, we realize that it doesn't do much. Nothing is turning the heart off, so all it does is show a heart continuously, no matter what you do. So, we decide to make it a little more interesting. Let's say we want each button and pin to show a heart, then show a smaller heart, and then turn the LEDs off. We drag 12 more blocks into the editor -- 6 show small heart blocks and 6 clear screen blocks -- and put them into place. That's 24 blocks.
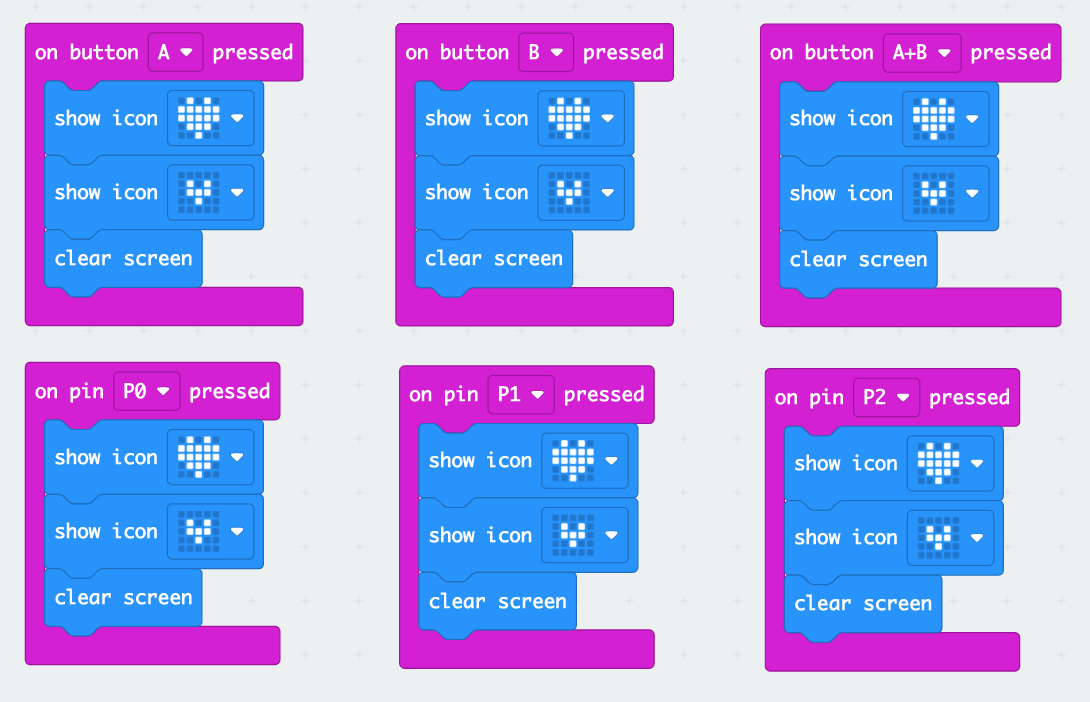
It's a lot of work to change all of those blocks! Now we're thinking that we want to add an even smaller heart to our animation. Instead of trying to keep track of all the places in our code where we want this heart animation to happen, and manually changing them all the time, we could use a function!
In MakeCode, you can make functions by going to the Functions tab. Right now, this tab will be empty because we don't have any functions yet. If we click the make a Function... button, a dialogue box appears where you can name your function, and set its parameters.
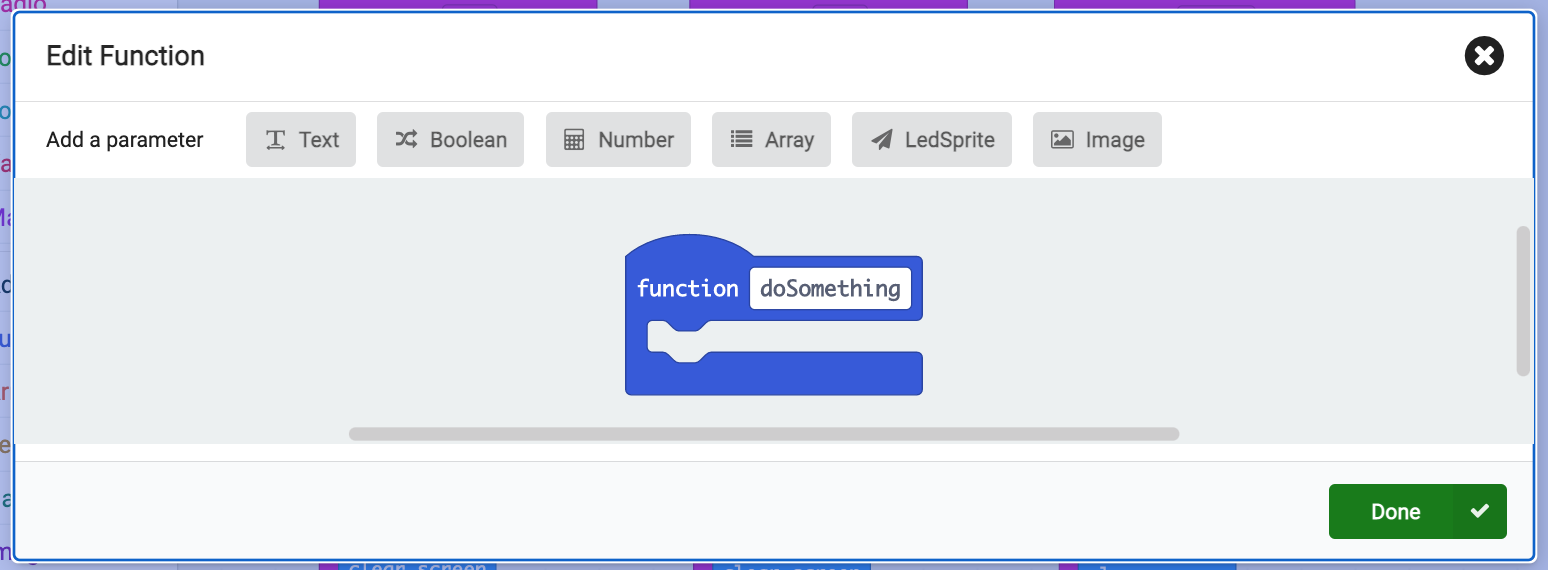
We'll talk a bit about parameters later. For now, we'll just name our function show-animation and click "Done." Now we have a new block in our editor called Function show-animation.
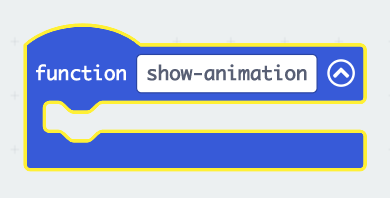
We'll put our show icon blocks and our clear screen block inside the function. Now, whenever we call our show-animation function, the micro:bit will show a big heart, a small heart, and then clear the screen.
If you look in the Functions tab again, you'll see that we have a few more blocks: return and call show-animation. We'll talk about that return block later. Right now, we want to use the call show-animation block to replace all the blocks we put in earlier.

Even though it looks a bit different, this code does exactly the same thing as it did before, except now, we can easily change our animation and add it to other blocks in our program anywhere we want to. Also, the code looks a lot cleaner and is easier to understand at a glance, making it much easier to work with. Now, all we have to do to add a smaller heart to our animation is add one block instead of 6!
Parameters and Return Values
The show-animation function we discussed earlier was quite simple. However, functions can also take parameters and return values.
A parameter is an input value for your function, and a return value is the output! If we think about a function like a machine, the parameter is what we put into the machine. Then, the code in our function acts as the gears of the machine, handling the input. Lastly, the output is what the machine produces!
Let's consider an example function called add(num1, num2), which takes two numbers as input and returns their sum. Here's an example of how it would look:
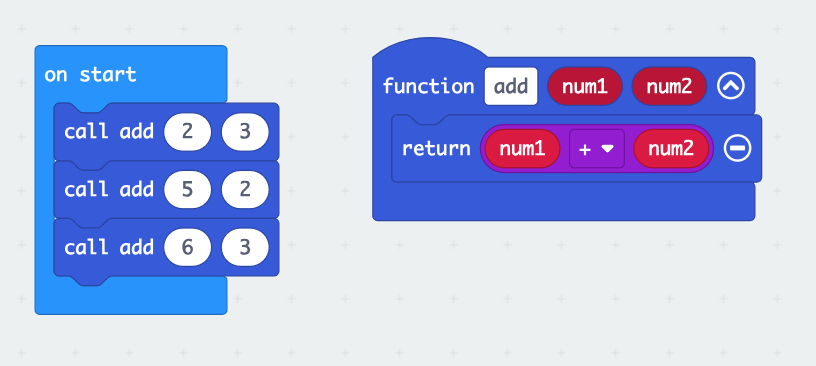
In this example, the function add(num1, num2) takes two parameters, num1 and num2, and returns a value to the caller (the block that calls the function). As a result, when the add(num1, num2) function is called with different arguments, the micro:bit will return different sums. You can add a few blocks to use this function so that the micro:bit will display: 5, 7, and 9.
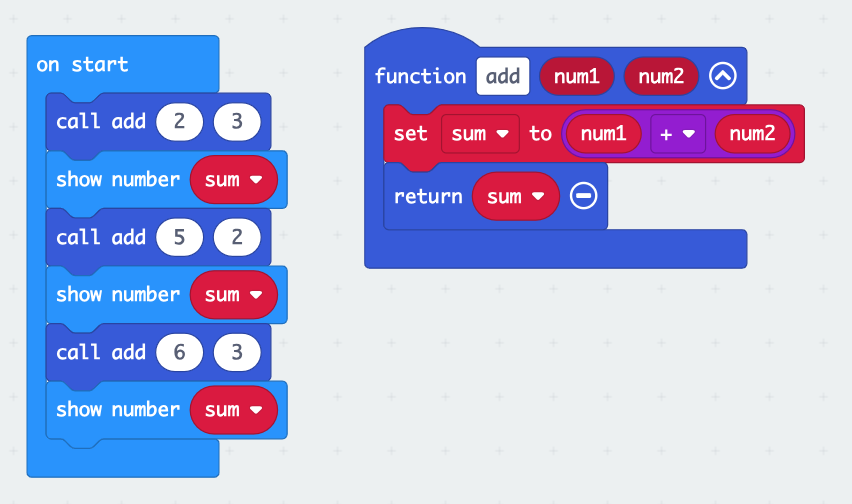
It's worth noting that functions can be called from various parts of the code, as demonstrated by calling the add(num1, num2) function within the show number block. That's pretty neat!
Notice that the return block in our example is flat on the bottom. It doesn't have the same notch that other similarly-shaped blocks in MakeCode have. That's because when you call return in a function, the function will stop executing at that point. That means you have to be careful when you return a value, as all the code after it will not execute! In fact, MakeCode won't even let you place any boxes below a return block.
Mini Activity: Learning Functions
Set-up
For this activity, you will need:
- 1 Micro:bit
- 1 Micro:bit cable
- Final Bee code
Step 1 - Reduce duplicate code
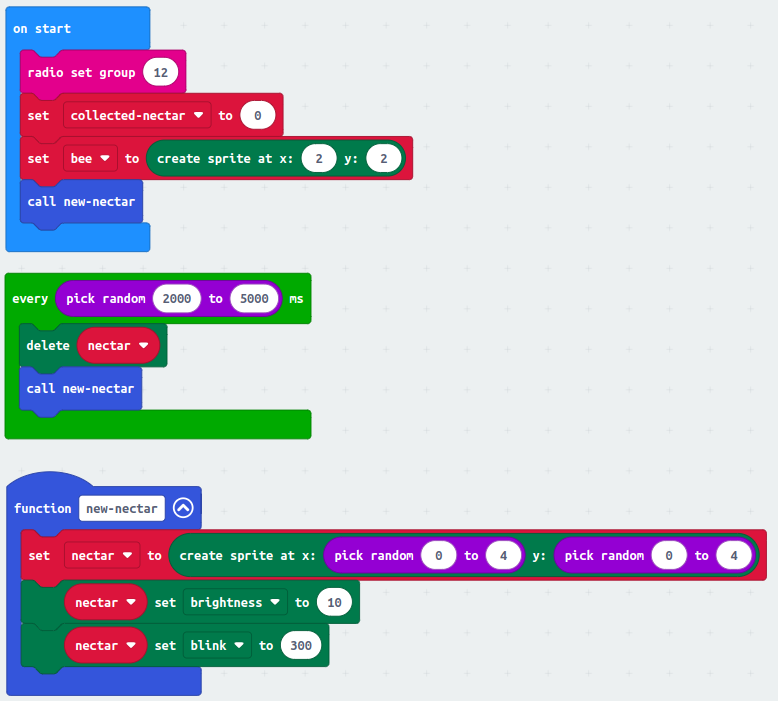
You may notice that some code has been repeated twice in different places. This code spawns a new nectar LED. Let's wrap that code in a function. Remember we should use functions to reduce duplicate code. This is helpful during the debugging and feature extension process because you only have to look in one place to update/revise code. Create a new function that describes the code it encapsulates, something like new-nectar will do. Grab the code to make a new pollen sprite and place it inside this new function. Finally, replace all the places this code was with the call new-nectar block to use your new function.
Hint
Step 2 - Simplify code
Another great use for functions is to increase the readability of code. The large if statement at the top of the forever block controls the movement of the bee sprite. However, that is not immediately obvious. Let's improve the readability of this code by making a move function that will house our movement code. Take the if statement and pause block and move them to a function named move. Remember to call your new function after removing the code.
Hint
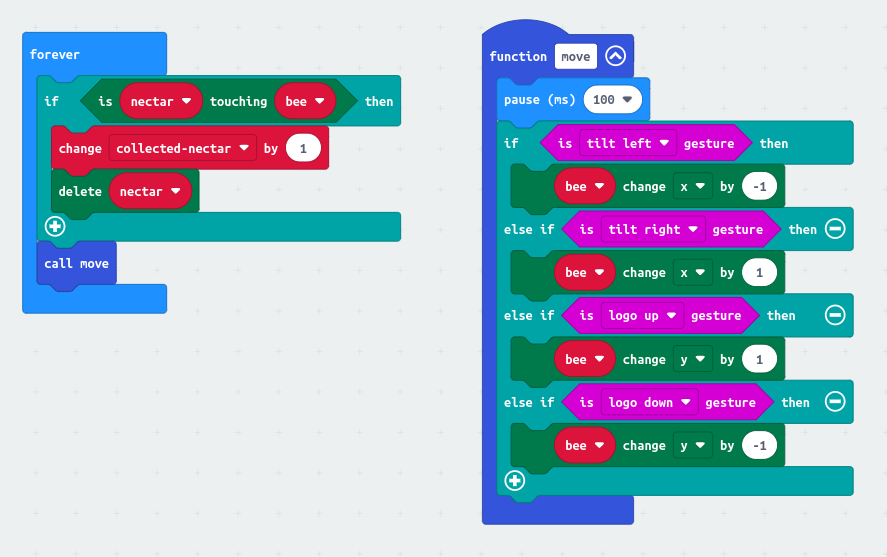
Step 3 - Final code with functions
Check your final code here: Final Bee code with functions
