Boolean Expressions and Control Flow
Boolean Expressions
A boolean expression is an expression that always evaluates to either true or false. Let's look at an example:
10 < 5
This boolean expression asks "is 10 less than 5?" and evaluates to false! You might be familiar already with the greater than, greater than or equal to, less than, and less than or equal to symbols. Here's a list of all the symbols we use to create boolean expressions while programming!
< - Less than
> - Greater than
<= or ≤ - Less than or equal to
>= or ≥ - Greater than or equal to
== or = - Equal to
!= or ≠ - Not equal to
Although the ≤, ≥ and ≠symbols are easy to write on paper, we aren't able to type them on a keyboard! Because many programming languages are typed, you will often see <=, >=, and != used instead. In Makecode, we'll see the first set of symbols already in the blocks, we don't have to do any typing! Also, many programming languages use == instead of = to compare two values for equality because they use the = to set a variable equal to a value. In Makecode, we use the set variable block to set a variable equal to a value, so the = symbol works to check for equality.
The values on each side of a boolean expression can be numbers, like in the expression 125 >= 32 (which evaluates to true!) or they can be math expressions like 7*5 == (7*counter) (which evaluates to true if counter has the value of 5, and false if it is anything else).
One of the primary reasons boolean expressions are useful is to help control the flow of our programs.
Control Flow: If Statements
Control Flow is the path your program takes when it is being run. Often, we want different things to happen when certain conditions are met. For example, we can use light level as an input to make an automatic light. If the Micro:bit senses that it is really dark, then the Micro:bit should turn on its lights, else if the Micro:bit senses that it is really bright, then it should turn off its lights. The light level is our condition, and there are two paths our program can take. It can turn on the lights or turn off the lights.
If Statements
If statements are what we use in programming to choose between two or more different paths. There are three main parts to if statements:
If- This is a statement that tells the computer what condition to look for; if that condition is met, then it completes its taskelse if- This is a statement that gives the computer a new condition to look for if the previous conditions were not met. If the else if condition is met, then it completes its task.else- This is a statement that tells the computer what to do if none of the above conditions were met.
Another important thing to know is that else if and else statements are completely optional. It's possible to simply write an if statement by itself. It's also possible to write if statements that have no result. Here's an example:
What do you think the computer will do if it's sunny outside?
if it is raining, then bring an umbrella
The way this is written, the computer actually will not do anything! You could stop writing here and let the computer do nothing if it's sunny, or you could write more.
if it is raining, then bring an umbrella
else if it is sunny, then bring sunglasses
Now, the computer will bring sunglasses if it's sunny, but it won't know what to do if it's anything except raining or sunny. So, you might want to add:
if it is raining, then bring an umbrella
else if it is sunny, then bring sunglasses
else stay inside
When it deals with if statements, the computer will run through each statement consecutively, checking for a condition to be met. As soon as it finds a true condition, the computer will complete the task attached to that condition and stop moving down the list. Here's one more example:
What do you think the computer will do if it's noon?
if it's morning, eat breakfast.
else if it's noon, eat lunch.
else if it's evening, eat dinner.
else eat a snack!
If you guessed "eat lunch," then congratulations! You've got this all figured out!
Activity: Honey Pot
Now that we know about booleans and if statements, lets use them to build on the code we wrote yesterday. Yesterday, we programmed one micro:bit to act like a bumblebee collecting pollen, and we programmed another micro:bit to act like a hive that counts the total amount of pollen that it gets from the bumblebee micro:bit.
In their hives, bees turn pollen into honey. We can use if statements and booleans in our hive code so that it turns the pollen into honey, too!
Setup
For this activity, you'll need two micro:bits, two battery packs, and the code from yesterday. In case you need it, you can get that code here:
For now, we'll just be updating the hive code, so go ahead and flash the bumblebee code to one of your micro:bits, then open the hive code and get ready to program!
Step 1 - Make a honey variable
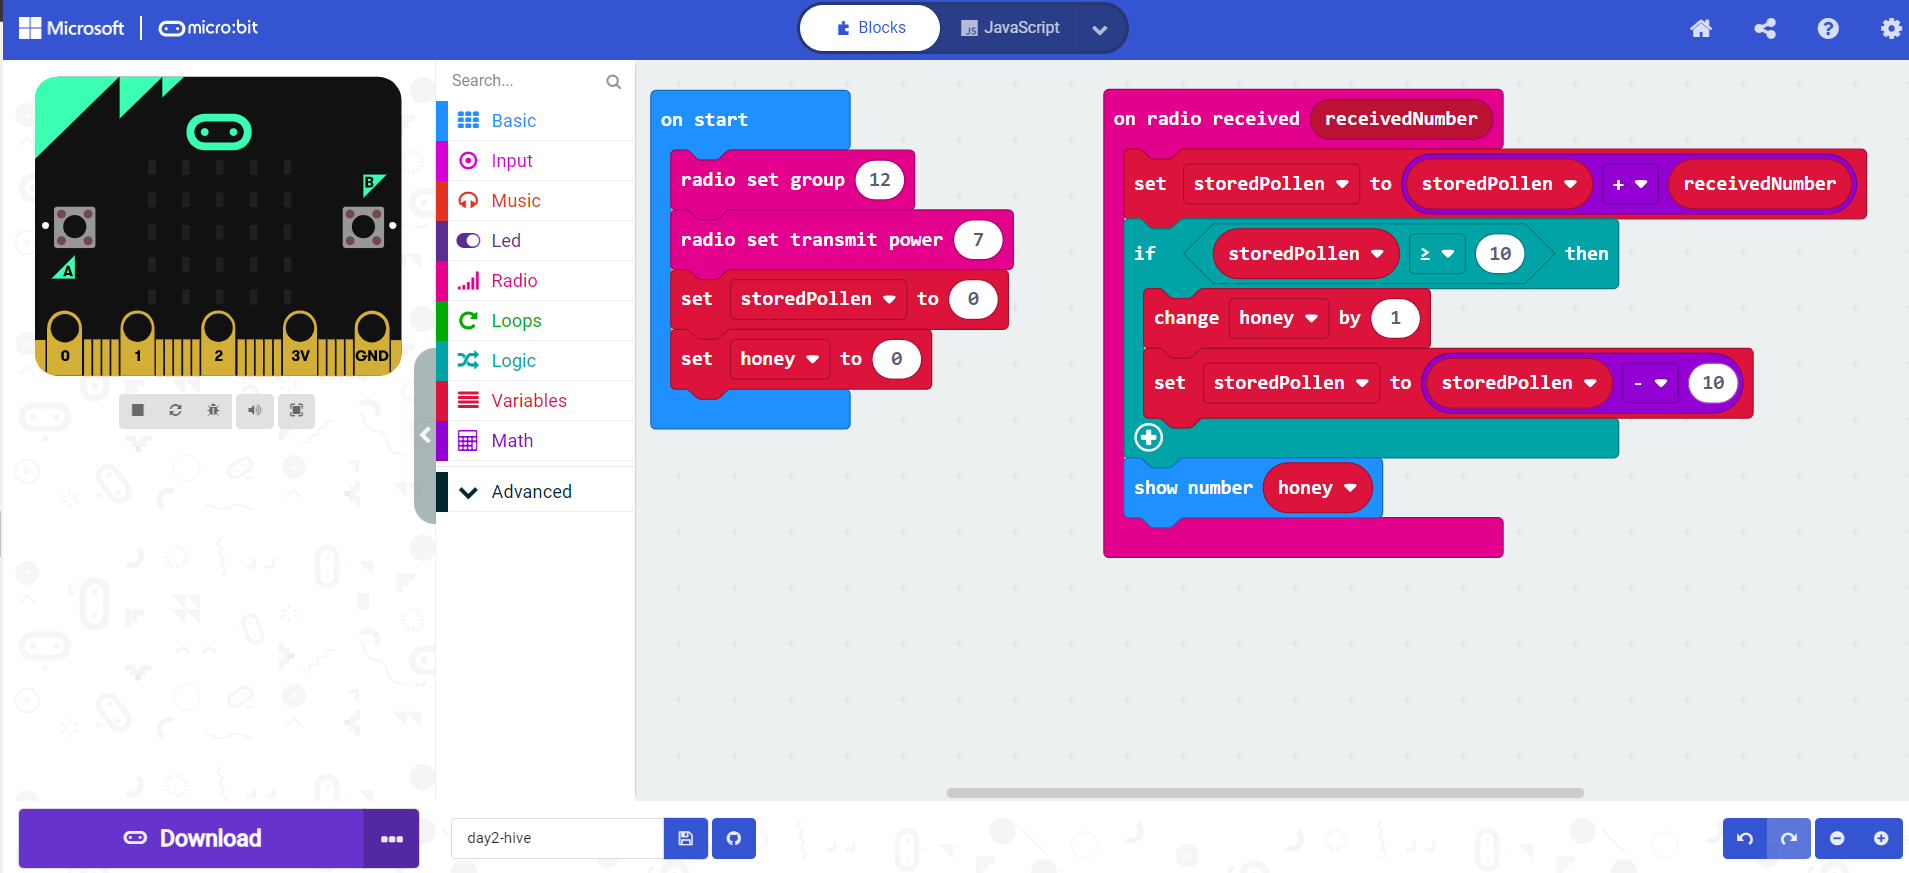
Let's start by creating a variable for our honey. Go ahead and make a new variable, honey and set honey to 0 in the on start block, under the set storedPollen to 0 block.
Step 2 - Use an if statement to turn pollen into honey
Let's say that it takes 10 pollen to make 1 honey. We could say that if there are at least 10 stored pollen, then we can make 1 honey. It sounds like we need an if statment! Our if statement will end up looking like this:
if stored pollen ≥ 10, then add 1 honey
In makecode, we use the if block to make if statements. We can find the if block, and the boolean expression blocks in the Logic tab. Head to the Logic tab, and drag an if then under your code in the on radio received block.
Now we're ready to write our if statement! Let's start with the if part of our block: if stored pollen ≥ 10. We need to add a comparison boolean to our if statement, so go to the Logic tab and drag a 0=0 block into the if block.
Then, fill in the if statement. Drag a storedPollen variable into the left side of the boolean expression, change the symbol from = to ≥, and change the right side of the expression to 10.
Now let's work on the then part of our if statement. We want our program to make 1 honey, which is the same as adding 1 to the honey we have. We've done this before with other variables - do you remember how? We could use a set honey to 0 block, and then add math to make the block set honey to honey + 1 like we have before, but there's a shortcut! Instead of doing all that, go to the Variables tab, and drag a change honey by 1 block into the if block. This block will change, or increase, a variable. In this case, it will increase honey by 1.
Since it uses up 10 pollen to create 1 honey, we also need to change the storedPollen variable after making honey! Can you think of how we can do this? Give it a try, and then come back for the answer! Hint: You'll need to use some math!
Click here to see the answer!
Step 3 - Show the amount of honey in the hive
Finally, let's change what's displaying on the micro:bit. Instead of having the micro:bit show how much pollen we have, let's set it to show us how much honey we have. To do this, you'll need to change your code in 3 places:
- When the program starts, we don't need to show
storedPollen, anymore. How do we get rid of it? - We don't want to see the amount of
storedPollenafter we receive it from the bumblebee anymore either. How do we stop this from showing? - Finally, we want to make sure the displayed amount of
honeyupdates whenhoneyis added to the pot. We need ashow number honeyblock, but where? Make you're best guess and then come back to check your code!
When you're all finished, your code should look like this:
Solution Code

Go ahead and flash your hive micro:bit to test all of this out. Now, for every 10 pollen that you send to the hive, you should see the amount of honey go up by 1!
Step 4 - Make a better display
Now that we know our hive program is working, let's make it look a little better! Instead of just showing a number representing how much honey we have, let's create a visual display! We'll do this by using the show leds block -- found in the Basic tab -- and one big if statement. We'll use our if statement to tell the micro:bit to show different led pictures based on how much honey we have. If there's no honey, the micro:bit will show an empty pot. If we have lots of honey, the pot will appear full!
You have all the tools you'll need to program the micro:bit to do this. So, we'll get you started, but then you'll try to see if you can finish this part on your own!
First, we need to determine where to put our code. In the previous step, we added a
show number honeyblock to ouron radio receivedblock. We'll probably need to replace that block with our new code. So, go ahead and delete theshow number honeyblock. In it's place, we'll add anifblock from theLogictab.Now we need to create our led honeypot. Add a
show ledsblock to the then part of the if statement (inside theifblock) and draw a little honey pot with no honey in it. Make sure you leave plenty of space for the honey we'll need to add later!Now we need to put some honey in our pot! You can click the plus sign at the bottom of the
ifblock twice to add anelseand anelse ifto the block.Inside the
else ifsection of the block, let's add anothershow ledsblock. Then draw a new honey pot, but this time add 1 honey sitting in the pot!Are you noticing a pattern? Let's continue by adding more sections to our
ifblock. We'll need oneshow ledsblock for each amount of honey that we can have in our pot. For our example, our pot holds 7 levels of honey! Let's add an empty hive toon starttoo!
You may have noticed that our if block is missing a very important part... We need to add all of our conditional statements! Let's see if you can finish this if statement on your own. Here are a few hints:
- Each
else ifblock will need a conditional statement that checks for a specific amount of honey - The first conditional statement should look something like this:
if there is less than or equal to 0 honey, then show an empty honey pot - The final conditional statement should look something like this:
if there is equal to or more than x honey, then show a honey pot that is full, wherexis the highest amount of honey that you can fit inside your jar.
Go try that out, flash your code, test things out, and then come back to check your answers. Remember that you'll need the Bumblebee Code to communicate with the hive. Good luck!
When you're finished, open Completed Hive from to see an example of what your completed hive program should look like.
Pass the Duck
Let's build a multi-player game called pass the duck. This game will resemble hot potato, and we will program the whole game from the ground up.
Set-up
This is a multiplayer game, so make sure you have 2 or more people. Each person will need:
- 1 Micro:bit
- 1 cable
- 1 battery pack
Step 1 - Initialize game
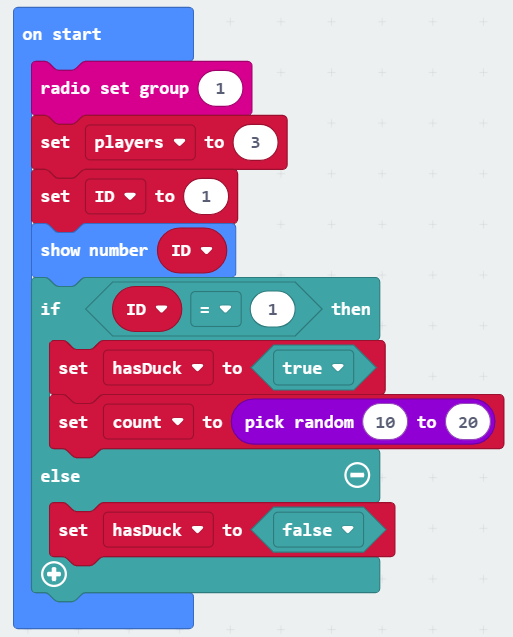
All of this code goes inside the on start block
For this game, we will need all the players' Micro:bits to communicate together, let's start by setting the group to 1 with a radio set group block. Below that, we need four variables: players, ID, count, hasDuck. Use two set variable to blocks for the following steps (we will set the other two next).
- Set players to the number of people you are playing with
- Set ID to your given number (1 - n)
Next, we will will display your ID on the micro:bit. Use a show number block and your ID variable. Finally, we will set-up some logic to handle how the game starts. Grab an if else block and place it at the bottom of the on start block. The if statement should read:
- If
ID = 1thenset hasDuck to trueset count to pick random 10 to 20
- Else
set hasDuck to false
Code check

Step 2 - Pass the duck
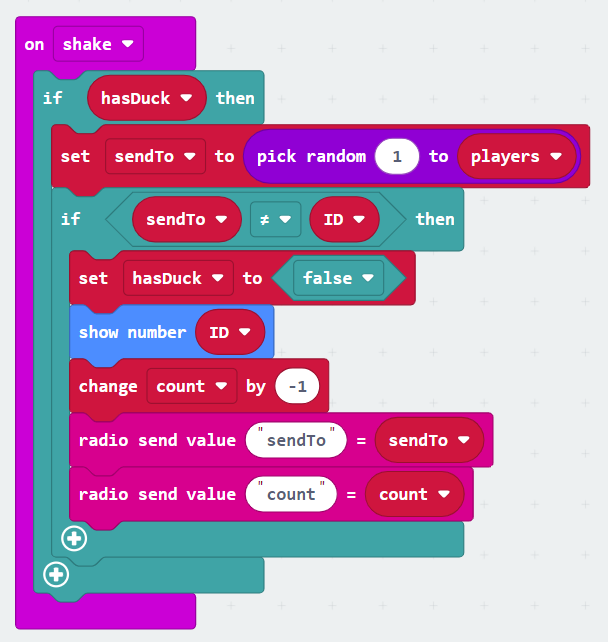
Now let's write the logic to pass the duck when the player shakes the Micro:bit. Grab an on shake block from the inputs tab. All the other code for this step, will go inside this block.
- First, we need to check if the player who shook the Micro:bit has the duck. We can use an
if statementwith ourhasDuckvariable to accomplish this. - Inside that if statement, let's generate a random player to send the duck to. Create a new variable
sendToand set that variable topick random 1 to players - Next, let's make sure the
sendToID does not match this player's ID. Grab anotherif statementand write the condition to read:if sendTo != ID then - Inside this if statement, let's finish the logic to actually send the duck. Start by setting
hasDuck to false. Then, show yourIDagain. Next, decrementcount. Finally, use tworadio send value "name" = 0blocks to send the newsendToID and thecounter. Check your code after this step.
Code Check

Step 3 - Receive the Duck
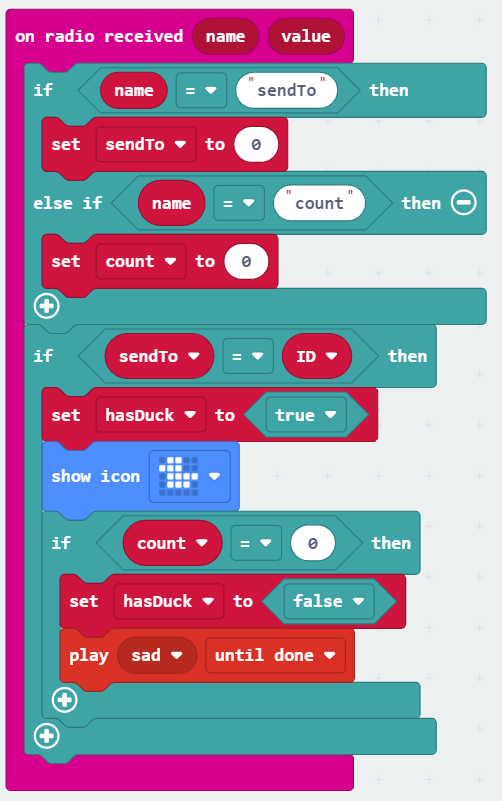
We have made it to the last step. Let's write the logic to receive the duck! Grab an on radio received name value block. First, we need to figure out which variables we received. Set-up an if / else if statement to read:
If name = "sendTo"set sendTo to value
Else if name = "count"set count to value
HINT: The red name and value ovals can be clicked and dragged into other blocks. Use this method for the above step.
Next, let's check if the sendTo ID matches this players ID. Write some code to read if sendTo = ID then set hasDuck to true and display a duck using the show icon block. Finally, let's check if the counter has ran out. Inside the previous if statement, Write some code to read if count = 0 then set hasDuck to False and play sad until done.
Code check

Step 4 - Test it
That's it! Great work. It's time to flash your code and try it out! Once you have completed a round, the last person with the duck is the odd person out. Click the little reset button on the back of everyone's Micro:bit to play again. If your code is not working check it with the solution.