Hello World
Welcome to Learning Micro! Today we are going to take the first steps in discovering the best parts of computer science. We are going to start with an introduction to computer science and the Micro:bit, and create our first Micro:bit program. Then, we'll introduce the sensor:bit and the sensors and try them out!
What is Computer Science?
Computer science is... you guessed it! The study of computers and how to compute things. To compute something means to determine something, oftentimes by using math. For example, you can compute the answer to 2+2 in your head! A computer is a device we use to compute the answers to a lot of different problems!
All computers do four basic things:
- Gather Input
- Store Data
- Process the Data
- Produce Output
An input is a method to give the computer information. One example of an input is typing out a text on your cell phone to a friend!
An output is a method to get information from the computer. One example of an output is the text message that appears on your screen from a friend!
Watch this video to learn a little bit more about computers (look out for those four basic things!).
So, computers take input, store it as data, process the data, and output the result!
Humans can be computers too! Look at the math problem 4 * 11 = and talk about how a human computes the answer. First, you gather input by reading the problem and store the data in your head. Then, you process the data and figure out the solution. Next, you output the solution by writing it down or speaking it out loud.
What is a Micro:bit?
The Micro:bit has these inputs:
- Buttons (A, B, and Reset)
- Bluetooth Radio
- Three Analog Pins (these can be used for a lot of things!)
- USB
- Temperature Sensor
- Light Sensor
- A Compass
- An Accelerometer (it reads how you move the Micro:bit through space)
And these outputs:
- 25 LED lights
- Bluetooth Radio
- Three Analog Pins
- USB
You may have noticed that the Bluetooth Radio, Analog Pins, and USB connection are both inputs and outputs!
In order to use the Micro:bit, we need to tell it what to do. Giving a computer instructions on how to handle input and output is called programming the computer. Let's get started!
Activity: Hello Micro:bit
We're going to program the Micro:bit to tell us "Hello" and "Goodbye"! We'll do this in five steps:
- Create a new project
- Get familiar with Makecode
- Write the program
- Flash the Micro:bit
- Test your code
Setup
For this activity, you will need:
- 1 micro:bit
- micro:bit cable
Step 1 - Creating our First Project
Let's head to makecode.microbit.org/v4 to start programming. We suggest using Chrome because it provides some additional features that we'll use this week. Once you've followed the link, make sure that you're using v4 by checking for the "v4" in the page URL. You should see a page that looks like this:
Click the purple square that says "New Project"
Give your project a name, something like "Hello Micro:bit" should do the trick, and click "Create".
Step 2 - Getting Familiar with the Makecode Editor
The Micro:bit can be programmed using a block-based programming language. You should be looking at a page with two Blocks, the on start and the forever blocks. We are going to use these and other blocks to tell the Micro:bit what to do!
Any blocks you place within the on start block will run when the Micro:bit turns on or resets, while any blocks inside the forever block will run over and over as long as the Micro:bit is on! We won't use on start or forever in our first program, but they will come in handy in the future!
On the far left of the screen, you should see a virtual Micro:bit.
The virtual Micro:bit lets you see how your program will behave before you download it to your own physical Micro:bit. Each time you add, change, or remove a block, the virtual Micro:bit will restart and run the code that is in the editor.
To the right of the virtual Micro:bit, there are several category tabs that hold all of the possible blocks we can use to program the Micro:bit
Click on the different categories and see some of the different blocks we have to use!
The main portion of our screen is the Makecode Editor. This is where we will place blocks that we are using to program our Micro:bit.
As we write programs, you'll notice that different blocks have different shapes. We can attach blocks together only if their shapes match, just like puzzle pieces!
Step 3 - Writing Our First Program
Now that we've gotten familiar with the Makecode site, let's write out first program! We're going to use the Button A and Button B inputs and the LED outputs to display messages!
Step 3a: Inputs
The first thing we need to do is tell the Micro:bit which inputs it should look for. Click on the Input category to bring up a list of the different input blocks we can use, and drag two on button A pressed blocks into the editor. To make an on button B pressed box, click on the A dropdown and change it to B so we have two blocks, one for each button.
Now, whatever we want the computer to do when we push Button A, we can put inside that block, and whatever we want to happen when we push Button B, we will put in that block!
Step 3b: Outputs
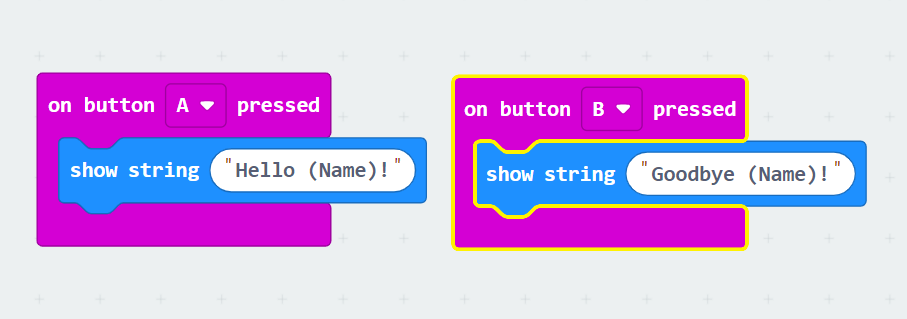
Let's have Micro:bit tell us hello when we push Button A, and goodbye when we push Button B. To do that, lets' go to the "Basic" category and drag the show string block into each of our button blocks. In programming, we call blocks of text "strings".
Now, we can replace the text inside of our new blocks with whatever text we want! Change the text so that when we push Button A, the Micro:bit will show "Hello Jane", but using your own name. Again, change the text so that when we push Button B, the Micro:bit will show "Goodbye Jane", but with your name.
Congratulations!! You just wrote your very first program for the Micro:bit. Let's use the virtual Micro:bit on the left to see if our program is working the way we expect it to. Click on the A and B buttons and see if the virtual Micro:bit displays the greeting and farewell correctly.
It looks like our program is running the way we expect it to, so let's download our program onto our physical Micro:bit and see if it works!
It's good practice to check your code before downloading it - this can save you some difficult debugging in the future! That's why Solution code will be hidden in a drop-down spoiler right before the flashing step for this and all future activities. If you get stuck, you can always compare your code to the solution!
Solution Code
Step 4 - Flashing the Micro:bit
Putting code onto the Micro:bit is called flashing, and it can work a little different depending on the type of computer and browser you are using. Regardless, the first thing you'll need to do is plug the small end of the USB cable you were given (micro USB) into the top of your Micro:bit, and plug the other end (USB) into your computer.
Chrome Shortcut (Preferred Method)
If you are using a recent version of the Chrome browser, you can connect your Micro:bit to Makecode and then just press the "Download" button. Your program will automatically be downloaded onto the Micro:bit! To do this, click the three dots to the right of the download button, and select, "connect device," and follow the on-screen instructions.
If you are struggling to connect your micro:bit, follow the steps that MakeCode suggests:
First, check your connection - there should be a yellow light that appears on the back of the micro:bit when it's connected to your computer. If you don't see a yellow light, try a different cable. If the connection seems good, you probably need to update the firmware on your micro:bit. To update the firmware, follow the directions at https://makecode.microbit.org/device/usb/webusb/troubleshoot.
Chrome on Linux
New Linux versions have known issues using webUSB. These steps are ADVANCED and require sudo access. Follow these steps to enable webUSB on Linux:
- Create a new file in /etc/udev/rules
sudo vi /etc/udev/rules.d/50-microbit.rules
- Add the following:
SUBSYSTEM=="usb", ATTR{idVendor}=="0d28", MODE="0664", GROUP="plugdev"
- Save the file
- Add current user to plugdev group
sudo usermod -a -G plugdev $USER
- Reload udev rules
sudo udevadm control --reload-rules
- Stop Chrome, unplug microbit.
- Start Chome, plug in microbit.
Flashing with All Browsers
Once your Micro:bit is plugged in, click the Download button on the bottom left-hand corner of the screen. This will download the program onto your computer as a .hex file. Now, all you need to do is drag and drop the .hex file onto the Micro:bit.
Depending on whether you are using Windows, Mac, a Chromebook, or other type of computer, this will look slightly different, but the idea is the same. Find the downloaded .hex file in your Downloads folder, and find the Micro:bit folder into your file system. Then, drag the .hex file onto the Micro:bit just like you would if the Micro:bit was a USB Flash Drive.
Your Micro:bit's yellow light on the back will flash repeatedly while the program is downloaded. Once the program has finished downloading, the yellow light will glow solid.
Troubleshooting
If you are having trouble downloading your program onto the Micro:bit, visit this site to get some help: Flashing the Microbit Support
You can visit these pages for specific help based on your browser. For Windows Browsers visit these pages: Microsoft Edge, Internet Explorer, Chrome (Windows), Firefox (Windows). For Mac Browsers visit these pages: Safari, Chrome (Mac), Firefox (Mac).
Step 5 - Test your Code!
Once the program is downloaded, let's try it out! Press the A and B buttons to see the text that you wrote scroll across the screen!
Wooo! We programmed the Micro:bit computer to take an input, a button press, and give us output, text scrolling across the LEDs. Inside the Micro:bit, a lot of things have to be processed in order to produce that text on the LED display, it needed to figure out what LEDs to use, and when to turn them on and off, and how long to wait before turning them on or off.
Feel free to click the Home button in the top left, and try out some of the tutorials that Makecode offers! You could also go back into your code and play with other outputs you might be able to assign to the A and B buttons (did you notice you can make pictures with the LEDs??).